Come impostare il Preorder su Shopify Senza un'App in 10 Passi
Want to keep selling products even when they are out of stock? With a few simple tweaks, you can convert your Add to Cart button into a preorder button to collect orders for upcoming inventory. Apps exist for preorders but often add costs and slow down stores unnecessarily. By editing some code, you can setup preorders on your Shopify store in just minutes without any app.
Why Preorders Make Sense
Preorders allow you to continue selling products even when inventory is depleted. This keeps customers engaged rather than losing their sale when they find a product is sold out. As long as you know more stock is on the way soon, preorders enable you to keep collecting orders in the meantime. This provides a better customer experience and more sales volume for your business.
While various apps exist for enabling preorders, they require monthly fees which eat into your profits. Apps also tend to slow down your store’s loading speed. For a simple preorder setup, you can tweak your existing code rather than need an app. This is faster, cheaper, and keeps your site speed optimized.
Getting Ready for Preorder Setup
To transform your Add to Cart into a preorder button, you will need to edit some code on your Shopify store. If tweaking code feels intimidating, consider hiring a freelance developer to help get your preorders established.
For store owners comfortable with code edits, the process is straightforward:
Step 1) Duplicate Theme

Go to Online Store in Shopify and duplicate your live theme first. This keeps changes isolated from affecting real customers. After duplicating, rename the theme adding “-preorder” to designate this theme’s purpose.
Step 2) Open Editor

Click “Edit Code” on your duplicate theme to view files. Use the left search bar to find the “Product” section. In the Dawn theme, we use “main-product.liquid“.
Step 3) Identify Button

- Go to your Shopify store’s website and view the source code of the page. You can do this by right-clicking on the page and selecting “View page source” from the menu.
- Look for a unique class name that belongs to the Add to Cart button. For example, in the dawn theme, the class name is “product-form__submit”.
- Copy the class name and save it for later use. You will need it to find the button code in the theme editor.
Step 4) Search for Class
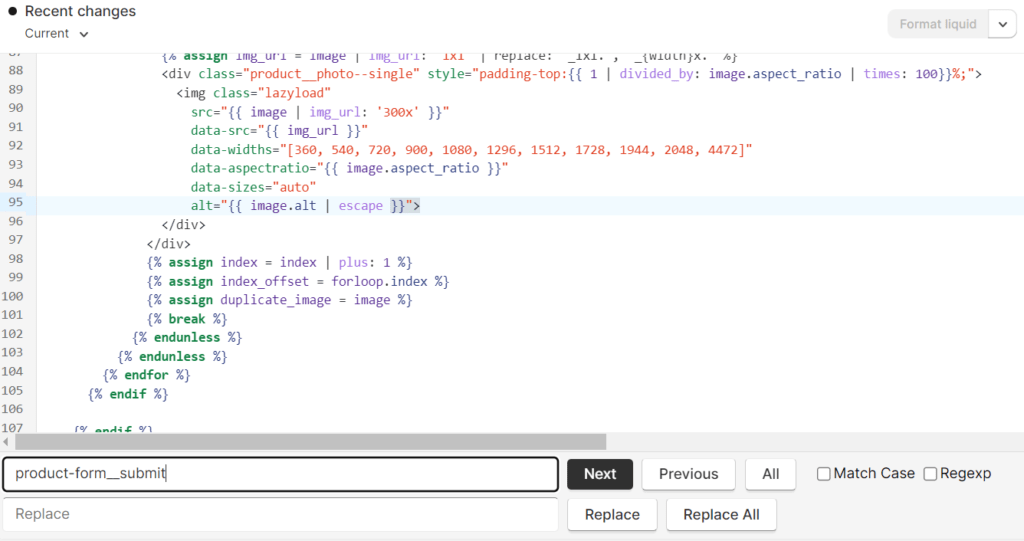
- Open the theme editor and select main-product.liquid from the list of files.
- To find the code for your button, use the search function of your editor. For Windows, press Ctrl+F, and for Mac, press Cmd+F.
- In the search box, type the class name that you copied earlier and hit Enter. This will highlight the code that matches your query.
Step 5) Set the Preorder Variable to True

{% for tag in product.tags %}
{% if tag contains 'preorder' %}
{% assign preorder = true %}
{% endif %}
{% endfor %}
Step 6) Add else-if Statement

It is an if-else statement that checks if a product is available for preorder and if so, adds it to the cart. Otherwise, it displays the add to cart button.
{% if preorder == true %}
Preorder
{% else %}
{{ products.products.add_to_cart }}
{% endif %}
Step 7) Change “Add to Cart” to “Pre-order”
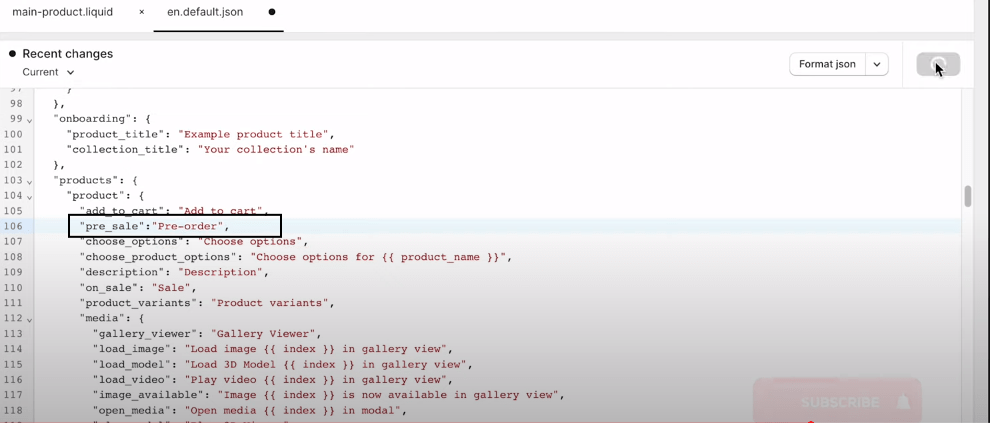
Go to the “theme editor” section, and search for “local” and for me it’s en.deafult.json. Paste below code below “add to cart” and hit on save.
"pre_sale":"pre-order",
Step 8) Change the Variable
Come back to main product and change the variable.
{% if preorder %}
  {% if product.on_sale %}
    {{ 'product.add_to_cart' | t }}
  {% endif %}
Step 9) Add the Tag “preorder”

- To mark a product as pre-sale, add the tag “preorder" e fare clic su Salva. Attendere qualche secondo affinché le modifiche abbiano effetto.
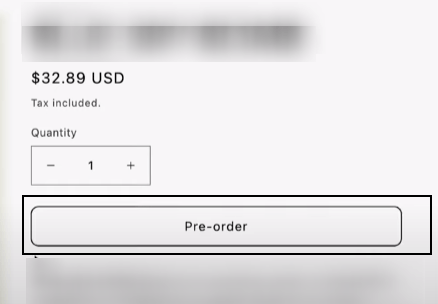
- Per visualizzare l'anteprima del negozio, andare alla pagina del prodotto e vedere come appare. Dovreste vedere un simbolo "prevendita" invece di un pulsante "Aggiungi al carrello".
Passo 10) Rimuovere il "Compra ora" dinamico
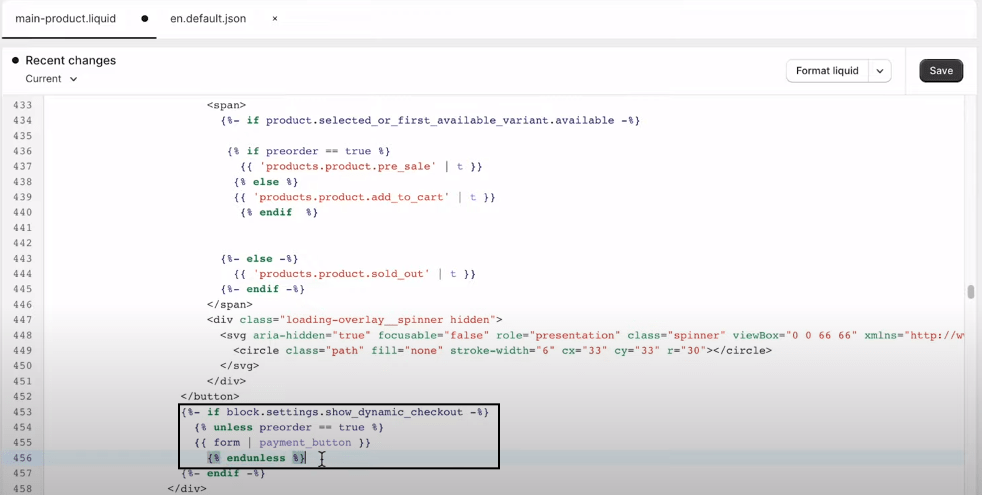
- Per nascondere il pulsante "Acquista ora", aprire il file "main-product.liquid" e cercare il codice che contiene "pulsante_di_pagamento”.
- Sostituite il codice con il seguente frammento:
{{ if block.settings.show_dynamic_checkout }}
{{ unless preorder == true }}
{{ form | payment_button }}
{{ endunless }}
Fase 11) Fatto!
Ulteriori suggerimenti per i preordini
Oltre alle modifiche di base al codice, ecco alcuni suggerimenti aggiuntivi per migliorare la vostra esperienza di preordine:
- Offrire sconti o prezzi promozionali sui preordini per incentivare gli ordini anticipati.
- Mostra un timer dinamico per il conto alla rovescia che indica il tempo limitato rimanente per il preordine.
- Limitare i preordini ad una certa quantità massima per creare urgenza
- Inviare un'e-mail ai clienti quando il preordine è di nuovo disponibile e pronto per la spedizione
- Incanalare i preordini in raccolte di ordini separate per una facile organizzazione
- Generazione automatica di e-mail d'ordine all'arrivo delle scorte.
- Visualizzazione di badge "Preorder" o di testo in sovrimpressione sulle immagini dei prodotti
Domande frequenti sul preordine
Ecco le risposte ad alcune domande frequenti sui preordini:
È possibile effettuare preordini su Shopify?
Sì, Shopify consente ai commercianti di offrire preordini per i prodotti del loro negozio online. Le funzioni di pre-ordine rendono super semplice per i negozi vendere i prodotti prima ancora di avere l'inventario. Così è possibile mettere in vendita qualcosa mesi prima che sia pronto per la spedizione. Molto interessante!
Con i pre-ordini su Shopify, un negozio può rendere disponibile una maglietta firmata di prossima uscita senza avere ancora le magliette. I clienti possono ordinare in anticipo per essere sicuri di ricevere la maglietta una volta terminata la produzione. Questo aiuta anche i commercianti a valutare l'interesse. Possono capire se le nuove felpe con cappuccio biologiche saranno un flop o un grande successo.
Quando viene addebitato al cliente il costo di un preordine?
Il cliente viene addebitato immediatamente quando effettua il preordine, anche se la spedizione avverrà in un secondo momento.
I clienti possono annullare un preordine se necessario?
È possibile consentire le cancellazioni e fornire i rimborsi entro una certa finestra, indicata nel documento politica del negozio.
Come faccio a notificare ai clienti la spedizione di un preordine?
Applicazioni di marketing come Privy vi permettono di segmentare i clienti in preordine per ricevere e-mail mirate all'arrivo delle scorte.
Ho bisogno di un'app a pagamento per abilitare i preordini?
No, potete usare i passaggi qui riportati per impostare da soli i preordini senza pagare un'app.
Conclusione
Per trasformare il pulsante Aggiungi al carrello in un pulsante di preordine bastano poche modifiche al codice, che consentono di raccogliere gli ordini anche quando i prodotti sono in arretrato. Assicuratevi solo di comunicare chiaramente ai clienti le tempistiche e le politiche di preordine. I preordini consentono di massimizzare le vendite continuando a vendere gli articoli esauriti.


