WordPress is great. It powers more than 40% of the internet for a reason. But if you’re running an online store and tired of wrangling plugins, patching together payments, or dealing with clunky checkout flows, it might be time to move to Shopify.
Shopify was built for e-commerce. It’s clean, reliable, and takes care of the technical mess so you can focus on selling. If your WordPress site has outgrown its usefulness—or you simply want a platform that’s built to convert—this guide will walk you through how to migrate without wrecking your SEO, losing customer data, or pulling your hair out.
Let’s get to work.
1. Know What You’re Migrating
Before you start, take inventory. Not everything from WordPress needs to come with you. Here’s what usually makes the trip:
- Products – Titles, descriptions, prices, images, SKUs, stock
- Pages – About, Contact, FAQ, etc.
- Blog posts – Optional, but important for SEO and branding
- Customer data – Emails, order history (if you’re using WooCommerce)
- Media – Product images, logos, page graphics
- URLs – For SEO continuity
Skip these unless you have a reason:
- WordPress themes
- Plugins (you’ll be replacing them with Shopify apps)
- Custom shortcodes
2. Choose Your Shopify Plan

Shopify’s pricing is straightforward. For most, the Basic plan ($39/month) is enough to get started. If you’re doing higher volume or need advanced reports, go with Shopify ($105/month).
Start with a free trial (usually 3 days or 3 months for $1, depending on promotions). You’ll need a plan before you can connect a custom domain and go live.
👉 Grab your Shopify free trial here.
3. Export Your WordPress Content
If you’re using WooCommerce, good. That means your store is structured and can be exported cleanly.
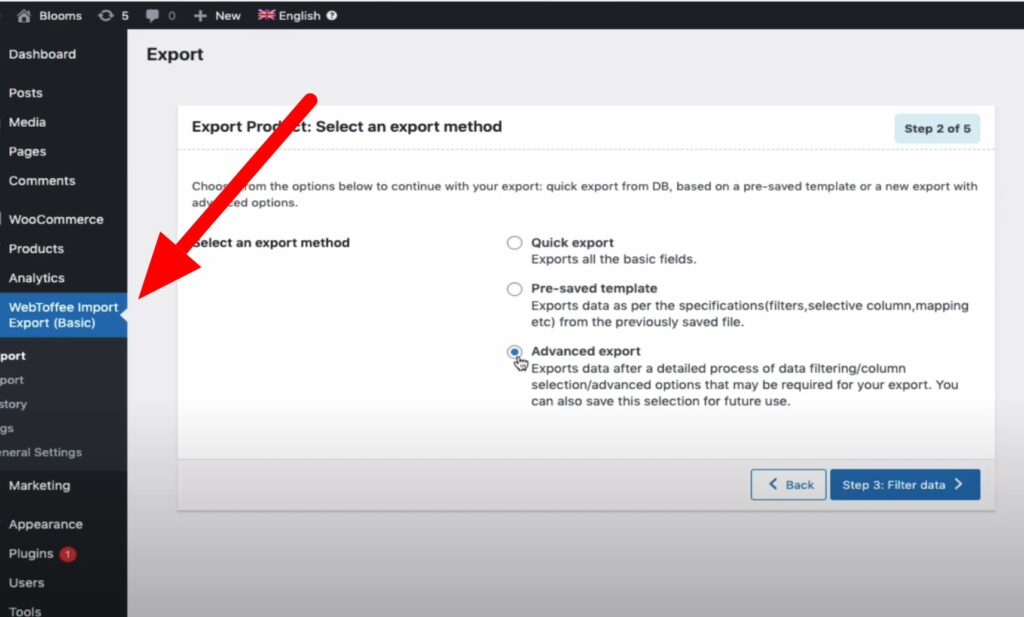
Exporting Products:
Exporting Pages & Posts:
WordPress has a built-in export tool:
- Go to Tools → Export.
- Choose All Content or pick Pages and Posts separately.
- Export and save the XML file.
Exporting Customers & Orders:
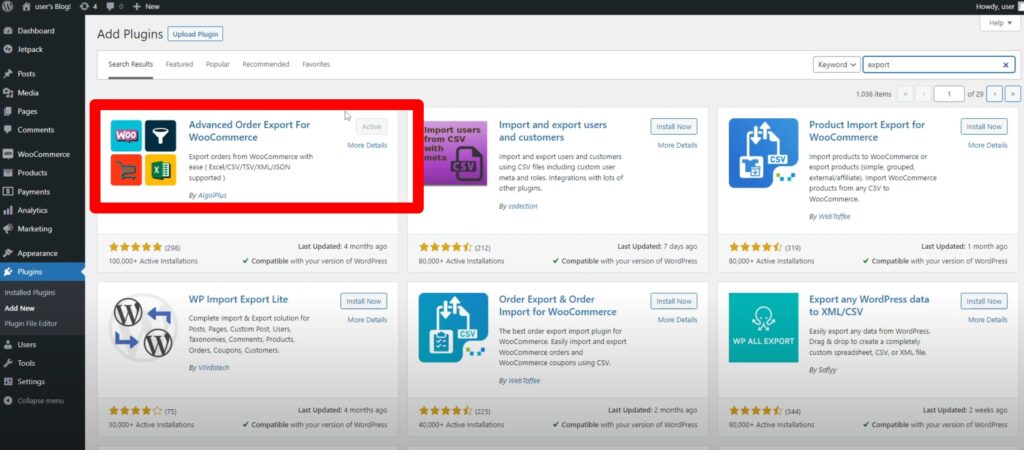
Go to WooCommerce → Orders, and use an extension like Advanced Order Export for WooCommerce:
4. Set Up Your Shopify Store
You don’t need to touch code to build a beautiful store on Shopify.
Basic Setup:
- Choose a theme (start with Dawn—it’s free and flexible)
- Add your logo, brand colors, and favicon
- Set your currency, tax, and shipping zones
- Configure payment gateway (Shopify Payments, PayPal, etc.)
5. Import Your Data into Shopify
There are three ways to import:
Option A: Use a Migration App
For most people, this is the smartest move. These apps do the heavy lifting:
- LitExtension – Reliable and detailed
- Matrixify – Powerful and flexible CSV import tool
- Cart2Cart – Works well for WooCommerce-to-Shopify moves
They’ll handle:
- Products
- Customers
- Orders
- SEO redirects
Yes, they cost money. But it’s cheaper than hiring a developer—and a hell of a lot faster than manual work.
Option B: Shopify’s Native Product Import
If your export file is clean:
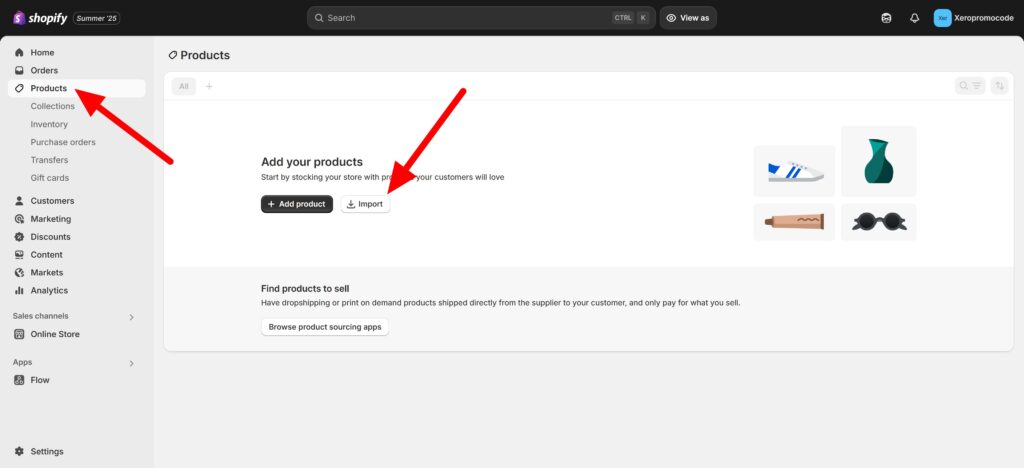
- Go to Products → Import.
- Upload your WooCommerce CSV.
- Map the fields (Shopify might detect them automatically).
But Shopify’s importer is basic. It won’t bring over customers, orders, or blogs.
Option C: Manual (Not Recommended)
You can copy and paste everything, but unless your store has 5 products and 2 pages, it’s not worth it.
6. Migrate Blog Content
Your blog matters. If you rank for SEO keywords or have backlinks, don’t lose them.
Use a tool like BlogFeeder or Matrixify to import your WordPress blog into Shopify.
Alternative:
- Export your blog as XML.
- Use a free WordPress-to-HTML converter.
- Manually recreate posts as Shopify blog articles.
Don’t forget to match the URL slugs if you want to preserve SEO value.
7. Redirect URLs (Do Not Skip This)
This is crucial.
If a customer clicks on a Google link and it leads to a 404, you lose them—and Google takes note.
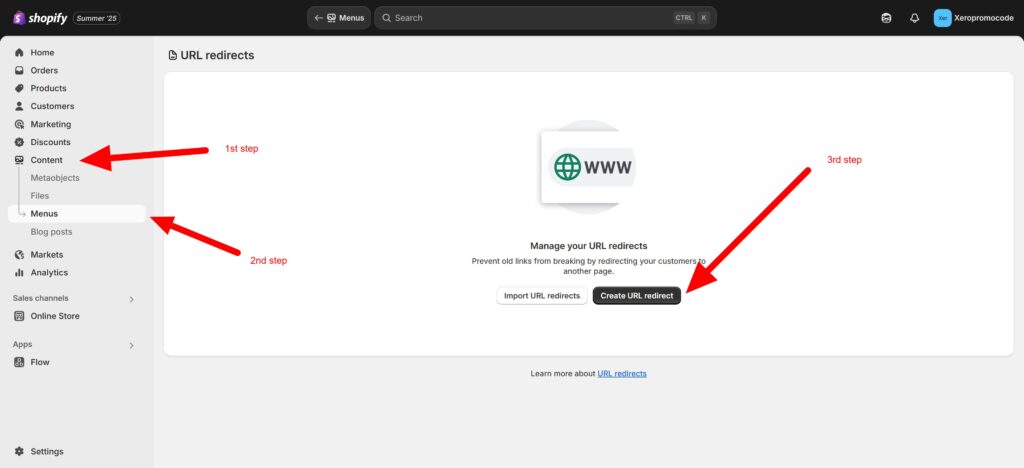
Create 301 Redirects:
- Go to Content → Menus→ URL Redirects.
- Add each old WordPress URL and its new Shopify equivalent.
Example:
bashCopyEditFrom: /product/blue-tshirt/
To:   /products/blue-tshirt
If you’re moving a big site, you can bulk upload redirects via CSV or apps like Easy Redirects.
8. Design Your Shopify Store
Shopify themes are clean by default, but don’t stop at “good enough.”
Customize Your Theme:
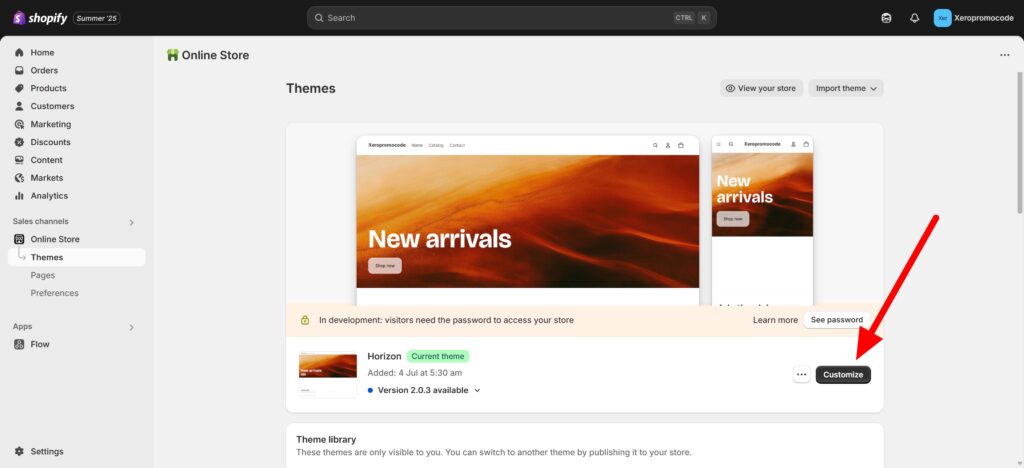
- Use the customizer (no coding needed)
- Add sections for testimonials, featured products, trust badges
- Edit the homepage to reflect your brand message
Pages to Include:
- Home
- About Us
- Contact
- FAQ
- Store Policies (Shipping, Returns, Privacy)
Use high-quality images. Avoid stock photos unless they’re top-tier.
9. Set Up Shopify Apps
Replace your old WordPress plugins with modern Shopify apps.
Here are must-haves:
- Email marketing: Klaviyo or Omnisend
- Reviews: Judge.me
- Upsell / cross-sell: ReConvert
- Live chat: Tidio or Shopify Inbox
- Analytics: Google Analytics + Shopify reports
Only install what you need. Too many apps can slow your store down.
10. Test Everything
Before you go live, run a full systems check.
Product Pages:
- Images load?
- Variants show correctly?
- Add to cart works?
Cart & Checkout:
- Discounts apply correctly?
- Shipping rates accurate?
- Payments go through?
Mobile View:
Shopify themes are mobile-friendly, but double-check. Over half your traffic will come from phones.
11. Connect Your Domain
If your domain is managed by a provider like GoDaddy, Namecheap, or Google Domains:
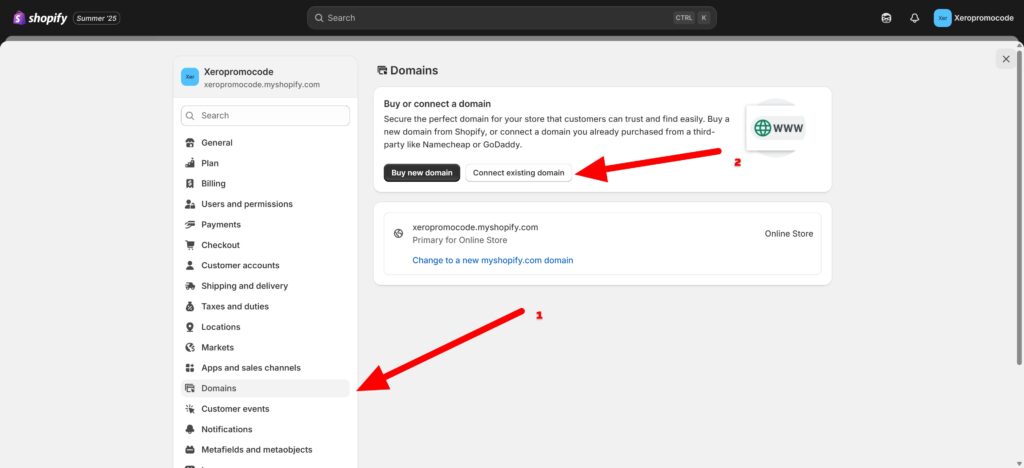
- Go to Settings → Domains in Shopify
- Click Connect existing domain
- Follow the instructions to update your DNS settings
Or you can transfer the domain to Shopify and manage everything in one place.
12. Launch & Announce
Hit that publish button and go live.
Then let people know:
- Email your list
- Post on your socials
- Update your bios
- Ping your affiliates
And if you moved your blog, update the RSS feed or newsletter URLs.
13. Monitor SEO and Traffic
Use Google Search Console to check crawl errors, broken links, and indexing issues.
Use Google Analytics or Shopify’s built-in analytics to track:
- Conversion rates
- Bounce rates
- Time on site
- Sales funnel
Expect a small dip in traffic after migration—Google needs time to adjust—but if you did your redirects right, it’ll bounce back.
14. Keep the WordPress Site as a Backup (Temporarily)
Don’t delete your WordPress site on Day 1.
Keep it:
- For reference
- In case of migration errors
- Until you’re 100% sure everything works
After 30–60 days, you can take it offline or repurpose it.
Final Thoughts
Moving from WordPress to Shopify isn’t just a platform switch—it’s a mindset shift. You’re moving from a content management system to a commerce engine.
Yes, there’s work involved. But once you’re on Shopify, things get easier. Maintenance goes down. Conversion rates go up. Your site looks better, runs faster, and works harder for your business.
If you’re serious about selling, Shopify’s where you want to be.
TL;DR Checklist
✅ Export data from WordPress (products, customers, pages)
✅ Set up a Shopify store and pick a theme
✅ Use a migration app or import data manually
✅ Recreate your blog or import posts
✅ Add 301 redirects for all old URLs
✅ Customize your Shopify theme
✅ Add core apps and features
✅ Test every part of the customer journey
✅ Connect your domain
✅ Launch and announce your new store
✅ Monitor SEO, traffic, and conversions
✅ Keep WordPress as backup until you’re confident
Need help with the move? You don’t have to do it alone. Drop your question in the comments—or reach out. A smoother e-commerce setup is just a few steps away.
